How to dehydrate fresh herbs without cooking away the flavor
Herbs need less heat than fruit or vegetables. Build one clean, low-temperature batch, remove surface water before loading, check leaves rather than trusting a timer, and keep the finished leaves whole until a recipe needs them.
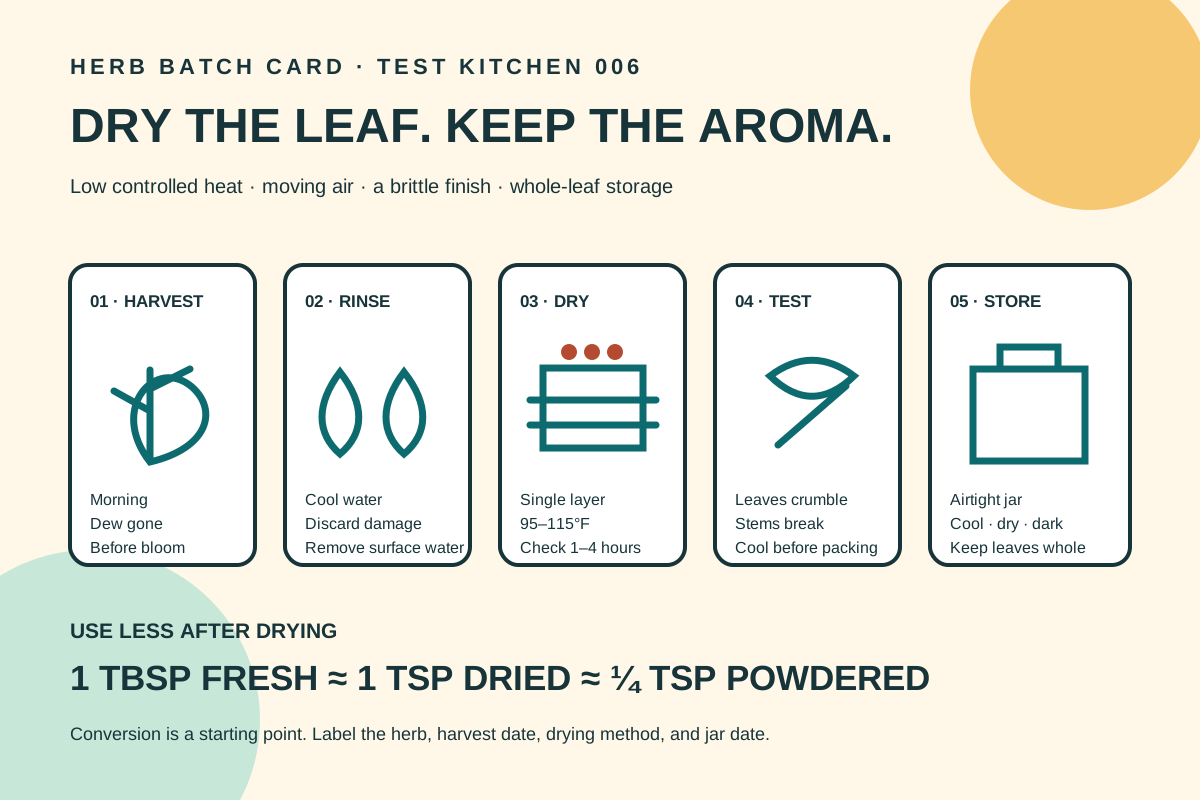
The end-of-season herb batch
- Harvest sound culinary herbs after the dew dries and before the flowers open when possible.
- Rinse in cool water, discard damaged material, and remove as much surface water as practical.
- Preheat the dehydrator to the research-based herb range and load one uncrowded layer.
- Check early: leaves should crumble and stems should break.
- Cool, package airtight, label, and store away from heat, moisture, and light.
The first chilly nights create a predictable preservation question: should every last basil leaf, mint tip, sage branch, and rosemary stem go onto the same dehydrator load? Usually not. Culinary herbs differ in leaf thickness, moisture, stem size, aroma, and the way they are used. A crowded mixed tray can leave tender basil overdried while woody rosemary stems remain flexible, and strong aromas can migrate through a warm-air machine.
A better final harvest is several small, named lots. Give each herb enough tray space, record its start time, and remove the pieces that reach the endpoint first. This takes a little more attention than a “set it overnight” approach, but it protects the qualities people are trying to save: color, aroma, and a clean, dry finish.
This guide focuses on correctly identified culinary herbs intended for ordinary food use. Do not dry an unknown plant, a decorative florist plant, or anything treated with a product whose label does not allow harvest for food. Drying concentrates flavor and reduces water; it does not identify a plant or remove an unsafe pesticide residue.
Choose drying when it fits the herb and the recipe
Drying works especially well for herbs used in cooked foods, spice blends, tea blends made from correctly identified food herbs, and shelf-stable pantry seasonings. Rosemary, sage, thyme, summer savory, and parsley are among the sturdier herbs the National Center for Home Food Preservation describes as easy to air-dry. Basil, oregano, tarragon, lemon balm, and mints have higher moisture and can mold if they do not dry quickly, which makes controlled dehydrator airflow useful.
Freezing may preserve a more fresh-like flavor for some tender herbs. Penn State Extension specifically lists parsley, dill, basil, chives, lemon balm, mint, and tarragon as good candidates for freezing. Frozen leaves become limp when thawed, so they suit cooked dishes rather than a fresh garnish. The practical choice depends on how the herb will be used:
Dry it
For seasoning jars, dry rubs, soup blends, tea blends, and recipes where brittle leaves can be crumbled.
Freeze it
For cooked dishes where a softer leaf is acceptable and a fresher aroma matters more than a dry texture.
Use it fresh
For garnish, salads, pesto, and any recipe where the tender texture is part of the result.
Do not force one preservation method onto the whole garden. A small trial jar and a small frozen packet can show which result your household actually uses before the next large harvest.
Harvest for aroma, then move directly to the sink
NCHFP and Penn State recommend harvesting most herbs just before flowers first open, when plants are in the budding stage. Gather them in the morning after dew has evaporated. Avoid bruising the leaves and do not leave cut herbs in the sun or sitting unattended. New leaves near growing tips often carry concentrated flavor.
That ideal moment will not always match an approaching frost, rain, or work schedule. If weather is closing the window, prioritize wholesome material and a prompt, controlled drying cycle over waiting for a perfect morning. Discard leaves and stems that are moldy, badly bruised, heavily soiled, diseased, or damaged by insects. The dehydrator is not a rescue step for spoiled plant material.
Keep the lot identifiable from the garden onward. If two similar herbs share a basket, label them before leaves separate from stems. This matters with different mint varieties, marjoram and oregano, or any household where one person does not recognize the harvest by aroma.
Wash, sort, and remove surface water
Rinse herbs under cool running water. Gently shake off water, then use clean towels or a salad spinner to remove as much surface moisture as practical without crushing the leaves. NCHFP tells home preservers to discard bruised, soiled, or imperfect leaves and stems. Penn State’s drying guidance starts with clean counters, utensils, and hands.
Surface water makes the dehydrator spend its first stage drying rinse water rather than the leaf. Droplets can also cause leaves to stick together and create shaded wet contact points. Let rinsed sprigs drain briefly on a clean towel while the dehydrator preheats, but do not leave a damp pile at room temperature for hours.
Separate leaves from thick stems when the stem will finish much later than the leaf or when the recipe uses leaves only. Small tender sprigs can sometimes dry together if the tested method and machine allow it. Whatever the choice, compare like pieces on each tray so one endpoint makes sense.
Preheat for herbs, not for the previous batch
The National Center directs home preservers to preheat a dehydrator to 95°F to 115°F for herbs. In areas with higher humidity, temperatures as high as 125°F may be needed. This is much lower than settings commonly used for fruit, vegetables, or jerky. If the machine cannot hold a low herb setting, consult its manual before improvising with an intermittent cycle or an open lid.
High heat can drive off the volatile oils that give herbs their aroma. Raising the temperature to finish sooner may cook the outside, fade color, and produce a flat jar. Room humidity, leaf moisture, tray load, stem thickness, and dehydrator airflow already explain why batches differ.
Do not add herb trays to a fruit, vegetable, or meat batch merely because there is open rack space. The temperatures and finish tests differ, and aromas can transfer. Run herbs alone or with compatible lots that use the same safe method and whose flavors you are comfortable combining.
Load a single layer and keep the airflow visible
Arrange herbs in one layer on clean trays. Leaves can sit close, but they should not form damp clumps or thick stacks. Keep small leaves from falling into the fan or heater by using the food-safe mesh or herb screen specified for the dehydrator. Do not substitute window screen, craft mesh, or another material unless the manufacturer confirms it is appropriate for food contact and operating temperature.
Place thicker pieces together and note their tray position. If the dehydrator manual calls for rotating trays, follow that pattern. If it advertises even airflow, still inspect more than one location; a packed leaf at the center can behave differently from an exposed edge leaf.
| Lot | Tray setup | Watch point |
|---|---|---|
| Basil, mint, lemon balm | Leaves or small tender sprigs in one loose layer | High-moisture leaves must dry quickly; inspect for stuck layers |
| Oregano, thyme, savory | Small sprigs grouped by stem thickness | Tiny dry leaves can fall through wide trays |
| Sage | Large leaves separated where practical | Thick leaf veins may lag behind the edge |
| Rosemary | Similar sprigs in one layer | Needles can feel dry before the stem breaks |
| Parsley | Leaves and tender stems spread loosely | Dense clusters trap moisture at the center |
Check early and use the crumble test
NCHFP gives a broad dehydrator time of one to four hours and says to check periodically. That range is a prompt to inspect, not a promise that every herb or every machine will finish within the same hour. Drying is complete when leaves crumble and stems break when bent.
- Start the first check at the early end of the tested range.
- Remove a leaf and a representative stem from the center and edge of more than one tray.
- Let the sample cool briefly before judging it; warm plant material can feel different.
- Rub the leaf between clean fingers. It should crumble rather than fold or feel cool and damp.
- Bend the stem. It should break rather than bow.
- Remove finished pieces and continue checking thicker material in short intervals.
If the herb darkens quickly, smells cooked, or loses aroma while the stems remain flexible, do not automatically turn the temperature higher. Check the actual setting, airflow, tray crowding, surface water, and whether the machine is suited to low-temperature herbs.
Do not package warm herbs. Cooling lets you verify the brittle endpoint and avoids trapping heat that can become condensation. University of Minnesota Extension recommends cooling dried foods for 30 to 60 minutes, warning that an excessively long cooling period lets the food reabsorb moisture from the room. For herbs, cool only long enough to reach room temperature, then package promptly.
Store leaves whole for longer flavor
Penn State recommends storing dried herbs whole because whole leaves retain their oils and flavor longer. NCHFP says leaves may be left whole and crumpled as they are used. Pack the cooled herb in a clean, dry, airtight container and keep it in a cool, dry, dark location. Heat, light, oxygen, and moisture all work against quality.
Label each jar with the herb name and variety, harvest date, drying date, method and temperature, and any relevant use note. A green jar without a name is not a pantry system. Keep jars away from the stove, dishwasher steam, sink, and sunny windowsill. Penn State notes that most dried herbs keep well for about one year, but aroma is the quality test. Replace a jar sooner if the herb has faded badly or no longer smells like itself when crushed.
Open a jar with dry hands and a dry spoon. Steam from a simmering pot can enter a jar held over the burner, so measure seasoning away from the pan. If a container shows condensation, damp clumps, mold, or an off odor, discard it rather than tasting.
Unlike dried fruit, herb guidance does not call for the same seven-to-ten-day conditioning routine. Do not invent a conditioning period that leaves a questionable herb sealed while moisture redistributes. Finish the crumble-and-break test before packaging, cool promptly, and monitor the jar.
Grind only a small working amount
Powder exposes far more surface area to air and humidity than an intact leaf. It also loses aroma faster and can clump. Keep the main supply whole, then grind a small working amount in a clean, dry spice grinder or with a mortar and pestle. Let any appliance motor cool between short pulses so friction does not warm the herb unnecessarily.
Sift only if the recipe needs a uniform texture. Woody stem fragments that do not powder cleanly can be removed. Label a powder separately because its strength and volume differ from crumbled leaves.
Kitchen conversion
Penn State gives this general starting point:
1 tablespoon fresh herb = 1 teaspoon dried herb = ¼ teaspoon powdered herb.
Flavor varies by herb, age, harvest, and recipe. Add less first, then taste when the dish safely allows.
NCHFP gives a similar broad principle: dried herbs are usually three to four times stronger than fresh, so use about one-quarter to one-third of the fresh amount. These are culinary conversion guides, not medicinal dosing instructions.
Run one jar as a quality audit
The strongest article, timer, or temperature chart cannot see your room humidity and tray load. Record one batch well enough to repeat it:
| Record | Why it helps next time |
|---|---|
| Herb, variety, and intended use | Separates a seasoning jar from tea or craft material |
| Harvest date and plant stage | Connects aroma and bitterness with timing |
| Washed weight and tray count | Shows whether the machine was overloaded |
| Set temperature and room humidity | Explains changes in drying time |
| Start, checks, removals, and finish | Shows which trays and pieces finished first |
| Final weight and jar size | Improves future packaging and yield estimates |
| Aroma check at one, three, and six months | Reveals when quality actually declines in your storage |
Use the audit to change one variable in the next batch. A looser load may improve color more than a different jar. Removing surface water may shorten the run more predictably than raising the thermostat. Store the notes with the fruit-conditioning records, but keep the herb finish test distinct.
Common herb-drying problems
Leaves bend
The batch is not finished. Return it to the dehydrator and recheck cooled samples.
Aroma is weak
Review harvest timing, heat, drying duration, crushing before storage, and jar location.
Color turns dark
Check bruising, delay before drying, high heat, crowding, and overly long exposure.
Jar clumps
Moisture may have entered. Do not taste a suspicious jar; discard if mold or spoilage is present.
Powder cakes
Grind smaller amounts and protect the jar from steam and humid air.
Mixed flavor
Run strongly aromatic herbs separately and clean trays between batches.
Sources and review notes
This guide was researched and reviewed October 13, 2026. Harvest, dehydrator temperature, finish tests, storage, and culinary conversion guidance was checked against:
- National Center for Home Food Preservation — Herbs.
- University of Minnesota Extension — Preserving Food at Home: Drying, reviewed 2026.
- Penn State Extension — Preserving Herbs by Drying, updated May 3, 2024.
- Penn State Extension — Freezing Herbs, updated July 22, 2025.
Follow the complete research-based method and the current manual for your dehydrator. Correctly identify culinary herbs before eating or preserving them.