How to dehydrate persimmons without leaving a wet center
Persimmons reward precision. Identify whether the fruit is a flat non-astringent type or an acorn-shaped astringent type, choose sound fruit firm enough to slice, keep every round the same thickness, and judge a cooled center instead of trusting an orange surface.
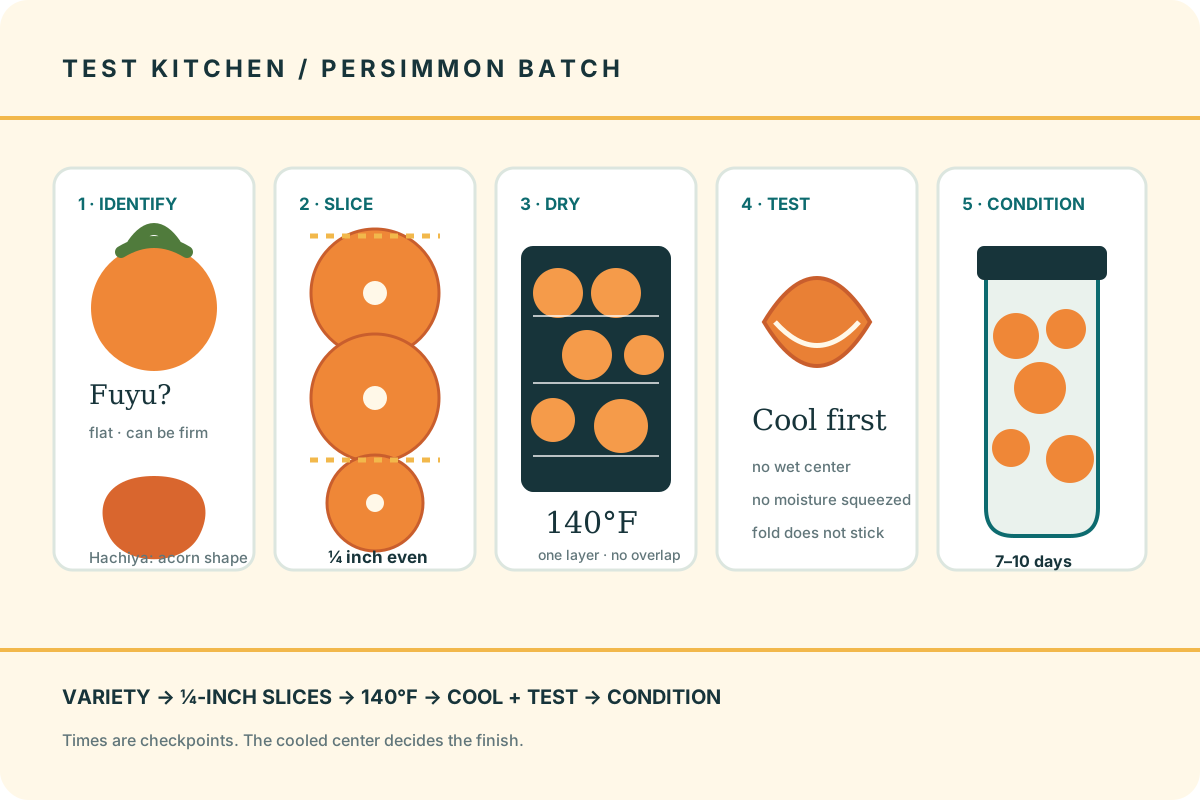
The persimmon batch plan
- Identify the variety or at least whether the fruit is flat/non-astringent or acorn-shaped/astringent.
- Choose sound orange fruit that is firm enough to cut cleanly; reject mold, fermentation, and deep damage.
- Wash under running water, remove the stem and calyx, and cut uniform ¼-inch slices.
- Arrange one layer with space for air and dry in a preheated dehydrator at 140°F.
- Cool a thick piece; cut, press, and fold it to check the center rather than the surface.
- Cool completely, condition for 7–10 days, then package in useful portions and label.
Start by naming the persimmon
The two shapes commonly sold in U.S. markets behave differently before drying. Non-astringent persimmons such as Fuyu and Jiro are usually squat and tomato-shaped. They can be eaten while crisp or after they soften. Astringent types such as Hachiya are usually elongated or acorn-shaped and are unpleasantly puckering when eaten before they become fully soft.
That fresh-eating rule creates a recurring question: must Hachiya fruit turn jelly-soft before it can go into a dehydrator? University of California Cooperative Extension separates fresh eating from drying. Its persimmon-preservation guidance says to select firm fruit for electric dehydration and states that dehydrating astringent persimmons removes the astringency. Utah State University’s drying table likewise distinguishes firm long, soft-type fruit from fully ripe rounder, drier types.
Do not use shape as a perfect botanical test or guess from a bin with no label. Ask the grower or seller when possible and record the variety. If the fruit is unknown, make a small, separately labeled batch. Drying concentrates flavor and sweetness; it does not rescue spoiled, fermented, moldy, or badly bruised fruit.
Choose firm fruit for clean slices
Select sound persimmons with full orange color and enough firmness to hold an even cut. A small surface blemish can be trimmed generously, but discard fruit with mold, leaking decay, a fermented odor, or damage that reaches through the flesh. Wash each persimmon under cool running water and rub it gently. Do not use soap or household cleaners on produce.
Remove the leafy calyx and stem. UC Extension allows peel-on or peeled slices; Utah State’s method directs peel removal. That makes peeling a texture choice worth recording. A peel-on batch may be slightly tougher at the edge, while peeled slices take more prep. For a first comparison, split one fruit into two clearly separated, labeled tray sections and keep every other variable the same.
Make ¼ inch the controlled variable
UC Extension allows slices from ¼ inch up to no more than ½ inch. Start at ¼ inch. It shortens the distance moisture must travel, gives the batch a more useful Extension time checkpoint, and makes a wet center easier to avoid. Use a sharp knife or a guarded slicer on a stable board. Measure the first few cuts rather than trusting your eye.
Cut across the fruit for rounds or into even wedges after halving. Remove seeds if present. Keep thick end pieces on a separate section of the tray so they can continue drying after the uniform rounds finish. Do not mix ¼-inch slices and ½-inch slices and then use a single finish time.
| Batch choice | What it changes | What to record |
|---|---|---|
| Fuyu or other non-astringent type | Can begin firm; round shape often yields even crosswise slices | Variety, firmness, peel choice |
| Hachiya or other astringent type | Firm fruit can be sliced for drying; keep this batch separate | Variety, full color, dried taste check |
| ¼-inch slices | More even drying and earlier inspection | Average thickness and tray position |
| ½-inch slices or quarters | Longer path for moisture; center test becomes critical | Separate finish time and cut test |
Skip the improvised dip
Utah State University’s persimmon entry says not to sulfur and lists no pretreatment as an option. UC Extension’s sliced dehydrator method does not require a dip. That is simpler than many fruit batches: wash, prepare, slice, and load promptly. Do not borrow a cranberry skin-cracking step or an apple browning dip without a research-based persimmon method.
If you follow an Extension method that includes syrup blanching, follow its complete quantities and sequence rather than improvising a sweet soak. Added sugar changes stickiness and the finished result. Record any pretreatment because it makes the batch less comparable with plain fruit.
Load one layer at 140°F
Preheat the dehydrator and follow its manual for tray placement, maximum load, mesh liners, and rotation. Arrange slices in one layer without touching or overlapping. Air needs access to the cut surfaces. Set the dehydrator to 140°F, the fruit-drying temperature used in National Center for Home Food Preservation and Extension guidance.
Utah State’s table gives a dehydrator estimate of 6–8 hours for slices and 12–15 hours for quarters. Treat those numbers as inspection windows, not promises. Variety, ripeness, slice thickness, peel, humidity, tray load, machine airflow, and thermostat accuracy can move the finish considerably. Begin checking a ¼-inch batch before the end of the range if pieces are thin or the room is dry; expect thicker pieces to need longer.
Dry continuously. Moving a partly dried batch in and out of the machine can leave it warm and moist for extended periods. Rotate trays only if the manual calls for it, and remove individually finished pieces rather than overdrying the entire batch to match one thick end slice.
Cool it
Warm fruit is softer. Let a thick slice return to room temperature before deciding that it is done.
Cut and press
Split the center. No bead or glossy wet pocket should appear, and no moisture should squeeze out.
Fold it
The piece should be pliable and leathery and should not stick to itself when folded.
The center—not the color—decides the finish
Persimmon slices can look beautifully dry around the edge while a thick center still holds moisture. UC Extension’s test is direct: cut several pieces in half, confirm that no moisture is visible or squeezable, and fold a piece to make sure it does not stick to itself. Penn State describes properly dried fruit as pliable and not tacky. Thin slices may become firmer, but crispness is not required.
Test more than one tray and more than one part of the fruit. A top tray, center tray, end slice, and seed cavity may behave differently. If any piece fails, return the matching pieces to the dehydrator. Write the additional time rather than quietly extending the batch; that note is valuable next November.
Persimmon batch record
Use one record per variety and thickness. A small controlled batch is more useful than a full machine with mixed variables.
Condition the fruit before pantry storage
Let the finished slices cool completely. Warm fruit sealed in a container can sweat and create enough moisture for mold. Pack the cooled fruit loosely in clean, dry glass or food-grade plastic jars, seal, and leave the jars where you will remember to inspect them.
For 7–10 days, shake each jar daily to separate pieces and redistribute small moisture differences. Watch the glass for condensation. If moisture appears, return the fruit to the dehydrator, dry it further, cool it, and begin the conditioning check again. If you see mold, discard the affected food; do not taste it or sort around it.
This is also when a white surface deserves careful identification. Traditional whole dried persimmons can develop a harmless sugar bloom, but that fact is not permission to label every pale or fuzzy growth harmless. If appearance, odor, moisture, or storage history creates doubt, discard the product rather than tasting to investigate.
Package in amounts you will use
After successful conditioning, pack persimmons in clean, dry, airtight, moisture-resistant containers. Smaller portions keep the main batch from meeting humid room air every time you want a snack. Label the variety, peel choice, slice thickness, drying date, and conditioning completion date.
Store packages in a cool, dry, dark place. The National Center for Home Food Preservation notes that dried-food quality declines faster as storage temperature rises and recommends checking packages for moisture during storage. Refrigeration or freezing can extend quality when the packaging prevents moisture and freezer odors.
Plan a use before making a large batch
Plain dried persimmon slices are intensely sweet and chewy. Test a small batch as a snack before loading every tray. Cut finished slices into oatmeal, granola, quick breads, trail mixes, or a fall cheese board. For a cooked dish, briefly plump the fruit with hot water or juice and then refrigerate and use it promptly; rehydrated fruit is perishable.
Very soft ripe pulp belongs in a separate research-based fruit-leather or freezing method, not on a slice tray. The dehydrator and freeze-dryer comparison explains why changing equipment also changes the process and result. For another late-fall fruit with a different endpoint, compare the pear guide.
Questions that change the batch
Can I dry Hachiya persimmons before they become soft?
For sliced electric dehydration, UC Extension says to select firm persimmons and reports that drying removes astringency. Use fully colored, sound fruit, keep the variety labeled, dry it completely, and test the finished small batch before scaling up. Fresh eating and drying have different readiness rules.
Do I have to peel persimmons?
UC Extension permits peeled or unpeeled slices, while Utah State’s table directs peeling. Either choice should be recorded. Peel removal may give a more even edge texture; peel-on prep is faster. Do not mix the two and then compare only time.
How long do persimmons take in a dehydrator?
Utah State estimates 6–8 hours for slices and 12–15 hours for quarters under its method. Those are checkpoints. Finish is determined after cooling by cutting, pressing, and folding several pieces.
Can I make hoshigaki with this method?
No. Hoshigaki uses peeled whole astringent persimmons hung in controlled airflow for weeks and handled through a distinct process. A ¼-inch electric-dehydrator slice is a different product. Follow a complete Extension hoshigaki method if that is your goal.
Primary sources and research notes
- University of California Cooperative Extension — Preserving persimmons — types, firm-fruit selection, washing, optional peeling, ¼- to ½-inch slices, sliced-dehydrator finish test, and separate hoshigaki method.
- Utah State University Extension — Home Drying of Foods — persimmon selection, peeling, no-treatment option, temperature framework, and time estimates for slices and quarters.
- Penn State Extension — Drying Fruits and Vegetables — clean handling, 140°F fruit drying, airflow, case hardening, cooled endpoint, conditioning, and storage.
- National Center for Home Food Preservation — Packaging and Storing Dried Foods — cooling, 7–10 day fruit conditioning, moisture checks, packaging, mold response, and storage temperature.
- Pacific Northwest Extension — Drying Fruits and Vegetables, fourth edition — current 2026 peer-reviewed foundation for appliance drying, pretreatment, packaging, storage, and food-specific tables.
Reader-question check: public dehydrating discussions repeatedly ask whether Hachiya fruit must be soft, whether a white coating is sugar or mold, why thick pieces remain wet, and whether 6–8 hours is guaranteed. Those questions shaped the troubleshooting above; the process recommendations come from Extension and NCHFP sources. Reviewed November 14, 2026.